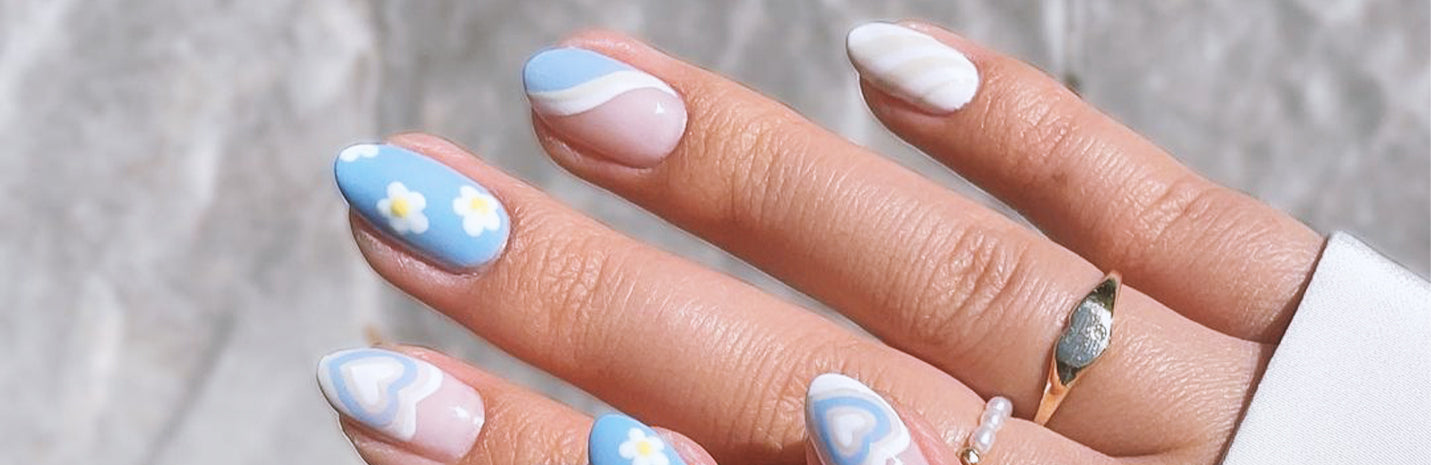
Have you always envied those influencers who post their nails on Instagram and every week you see different nail art? What if we say that it is doable at home with simple tools that you may already have at your home? Yep, that is what we’re going to learn today. Here’s what you need to doodle on your nails and how to paint them with different nail art!
What do you need for artsy nails?
Artsy nails are simpler than they look and some of the nail arts are also reasonable in terms of material required. You can play a lot with what you have instead of surfing through the browser to find the updated kits. Just like any other DIY art, DIY nails are also cheaper and easy to do at home. Here’s all you need to play with your nails. If you have two-three items from this list then you’re good to play with your nails:
1. Board pins
2. Nail paints (Duh!)
3. Tape
4. Sponge
5. Thinnest flat painting brush

The list can go on but these materials can give you multiple artsy nail looks. Let’s look at some easy DIY nail art to try out right now!
DIY ideas for nail art?
While there are many easy nail arts, we picked some fun and doable art that you will want to try every week. Get hooked here:
1. White/Golden stripes
You need to set a base of paint for this art. Keep the shade that goes well with white or golden stripes. We’d say that pastels or nudes are the best picks for it. Once your base is set, you can use the regular nail paint brush. Gently brush it over the nails to create irregular stripes. It is art when it is not perfect too. To get the right stripes, you can use tape. Take a piece of tape, cut them and paste it on the parts of your nails that you want to cover. Now without the worry of uneven lines, you can paint the open parts of your nails and remove the tape once it is dry.
Sublime picks Disguise Cosmetics Whimsical White. It’s a solid white that can pop as stripes on your nails.

2. Dot party
Start with the regular way of painting your nails with a colour of your choice. And then add suitable colours by using your nail paint brush to create small dots. To avoid making big dots, take only little paint on your brush and gently touch your nails to achieve those small dots. We love combining yellow and orange or chocolate brown and nude brown as a combination. You can even add a twist to this by using the different combinations for each nail.
3. Shimmering tips
This nail art is the most subtle yet eye-catching, we believe. Paint your nails with possibly a very light shade as a base. Let’s say if you’re a fan of green colour then we’d say light pistachio green. Then pick a shimmery nail paint. It could be golden or silver or of the same shade that your base is in. So if your base is green, you can pick a shimmery green shade to cover your tips. To cover your tips, you need to take a little bit of shimmery nail paint and follow the edge of your nails to cover them in a thin line. Let it dry and coat with a transparent shade to achieve a glossy look.
Sublime picks Disguise Cosmetics Frosty Violet. It can be used to paint entire nails since the shade is so subtle and rich. It can also be used to cover the tips with a shade of lavender as the base.

4. Mismatched shades
This is the lazy girl’s way to maintain good-looking nails. All you need is your collection of favourite nail paints and match them all by grouping them into five. One for each nail. Let’s say you love nudes and pink shades. You can add them and throw them in together by using one on each nail. It instantly makes the nails look fun. If you’re in a playful mood and you’re going to a daytime party, you can use different shades like green, pink, purple, orange, and brown together. One rule to remember is to use similar tones of colours. For example, if you’re using neon pink then opt for neon shades throughout all your nails. The aim is to look fun and not clown!
Sublime picks House of Beauty’s Charoite, Lavender Dust, Blue Chalcedony, Strawberry Bark, and Ninja Army. These five shades put together can make for tasteful mismatched nail art.


5. Contrasting base
This is super easy to do. You need to paint your nails with a shade of your choice. Once the base is dry you can pick another shade that you want to pair up with the base shade. Try to pick a contrasting shade to make the art pop out on the nails. Use the second shade to cover the bottom of your nails. It can be in multiple patterns. You can make a mountain shape at the bottom or a simple one dot or dome shape. To get a clean shape, you can use tape to cover the upper portion of the nail which you don’t want to colour with the second colour. This best suits long nails.
6. Mixing shades
Just like how we learnt to do mismatched shades, you can also mix the shades in one single nail. It’s best to stick to just two shades in one nail for this. Divide your nail in two with the help of tape and paint accordingly. You can use two shades of the same colour or two different colours. The idea is to tap the Picasso in you. This can also be done without tape and even though it looks like it may have taken a lot of energy, it is easy to do.
7. Just swoosh it
Paint your nails with a base shade and decide where you want to add a little bit of different colour. For example, you can swoosh an irregular line with a second colour that can cover your bottom and one side of the nail or you can swoosh one tip of the nail to create a triangle shape with the second colour. The latter design suits those who have box-cut nails.
8. Ombre Nails
Ombre nails look super cute and fresh as if you just stepped out of a salon. You can even do this at home. All you need is a flat brush, flat makeup sponge and nail paints of your choice. First thing first, pick the shades that you want to use for the gradient effect. For instance, if you have pink and grey nail paint then you can pick those and first paint the sponge in stripes. Make sure to keep little to no space between the shades on the sponge. The stripe width has to be kept according to your nail length. Both the stripes' lengths put together should be just enough to cover your entire nail. Now start dabbing the sponge on your nails. It will mess up the nail cuticles but you don’t want to worry about it. After you’re done with one layer, let it dry and then add another layer of dabbing. This will give you the perfect gradient effect. Once the second coat is dry, apply a transparent top coat to keep the gradient effect in place. Use a flat, thin painting brush to dip in acetone and remove the paint on your cuticles. Voila!
Sublime picks Plum Color’s Pink Dust and Disguise’ Grey Cloud. They can create a beautiful ombre shade for a subtle look. To top it with a transparent coat, we’d pick Kanai Organics Non-Toxic Nail Paint - Me On Top. Ten points for the mindful non-toxic formulation!


9. Marble Art
There are two ways to do this. You can do it with the help of a board pin or just with a tile and flat thin painting brush. Start with painting your nails in strips of white and other shades of which you want the marble effect. Before the stripes dry off, use a board pin to swirl around the stripes randomly such that it creates a marble effect. Once it dries off, use a transparent top coat to set the effect. You can also do this with the help of a tile and flat thing paintbrush. Create close stripes of different shades that you want the marble effect of. For instance, if you want a brown marble effect, pick white paint, nude brown paint, and dark brown paint. Make stripes of it vertically and then use a board pin to swirl around the colours, You will see the marble effect on the tile. Now pick this paint horizontally such that it picks up all the shade on a flat thing brush. Gently place the paint in a zig-zag path on your nail with the help of a brush. To funk it up, you can use glittering nail paint and create small swirls to highlight the marble effect with the help of a board pin. The Board pin will help you create thinner lines on the nails.
Sublime picks House of Makeup’s Caramel Buttercream and Nitro Coffee. This combination along with white can give you the perfect marble effect.


Summary
Artistic nails are so important for that aesthetic coffee and hot chocolate session photos on the gram. But going to the salon every week is just not ideal for our pocket and schedule. DIY nail art without any mess is an achievable goal and the nail art that we mentioned proves just that. Try and try till you get perfect nails!
- Divya Salvi